Getting CDash to work on Debian 9 (stretch) with lighttpd and MariaDB

After reading It’s Time To Do CMake Right and The Ultimate Guide to Modern CMake I stumbled about the slides of Effective CMake by Daniel Pfeifer. (I did not watch the related video C++Now 2017: Daniel Pfeifer “Effective CMake” though.)

What attracted my attention where the commands ctest_coverage() and ctest_memcheck() from the slide about CTest which comes with CMake and which I already use. In libcgi and some non free projects I create additional tests to be run with valgrind if that tool is found on the build host, but when using CTest/CDash I don’t need to do that and also get coverage tests on top, so I set up a local CDash server on my workstation, which was painful in multiple ways.

After extracting the CDash archive and configuring lighttpd to server its PHP files the install.php came back with the following error message:

Specified key was too long; max key length is 767 bytes

It was not easy to find the cause. The web says this is fixed in MariaDB 10.2.x while my Debian stable still has 10.1.x … and I found only some workarounds on that problem for other projects than CDash. I could “solve” that by changing the database collation from utf8mb4_unicode_ci to utf8_unicode_ci in phpMyAdmin on the still empty database cdash before running install.php.

The more challenging problem was to actually submit results to the CDash server when calling CTest. The webserver always responded with HTTP Status Code 417. That was only partly fault of CDash, which seems to call curl with some strange (?) headers for submission. That turned out to trigger some (from my side) unexpected behavior in lighttpd, for which several tickets exist, I found #1017 eventually, which led me to the lighttpd 1.4.21 release info giving the hint I needed. I added this somewhere in my lighttpd config files:

server.reject-expect-100-with-417 = "disable" 

In the end I have a local CDash instance now and could already submit some helpful coverage and memcheck results. Best thing: This way I can remove the error prone additional tests from my CMakeLists.txt and still run the tests with valgrind, even more flexible than ever.

stunning-palm-tree

So, what is this all about? Every now and then I want to try if I can solve some programming problem and make a tiny new project for that. For convenience I publish them on GitHub so I can clone them and play with them from multiple computers. Maybe someone else finds it and it helps someone, who knows.

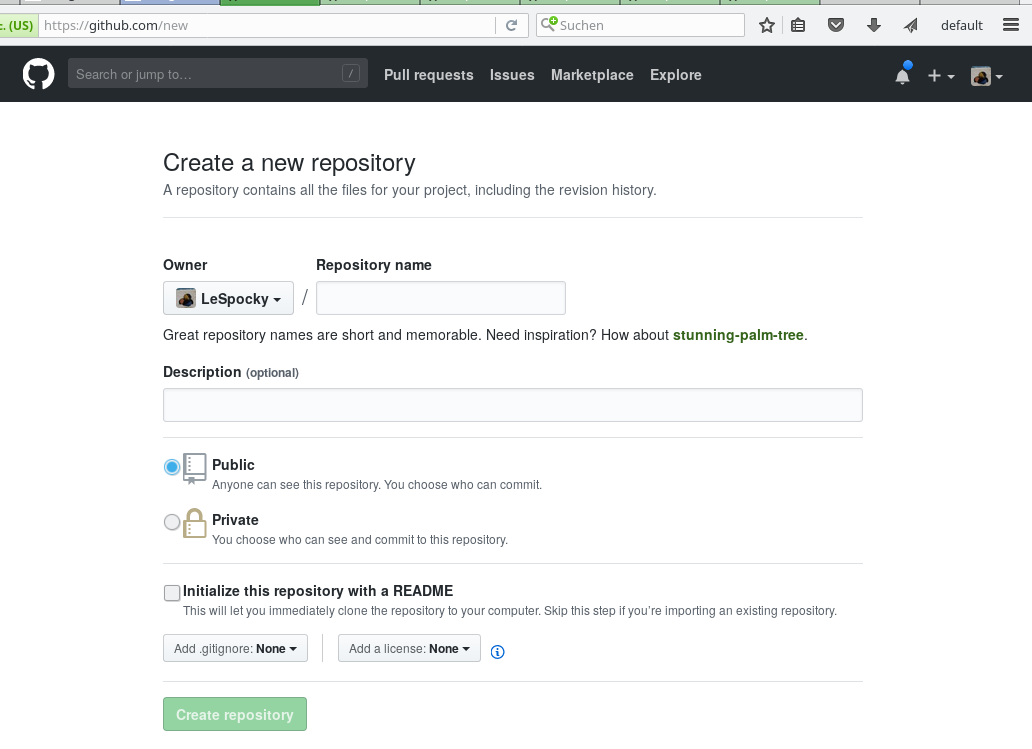
I could name those tiny (not so) throw away projects like “testthis” or “evaluatethat” or come up with some more or less matching name, but GitHub has a nice feature when creating new repositories, GitHub makes a naming suggestion and I just pick that. See:

Screenshot GitHub new repository creation

Create a new repository on GitHub

Over time the number of those projects grew and to not lose track of them, here is a list:

Bridges with meaningful error messages

Just wanted to create a network bridge interface on an embedded Linux system. First try was with the well known brctl and I got this:

$ brctl addbr br0
add bridge failed: Package not installed

Searching the web for this, led me to an old blog post which comes to this conclusion:

So that’s the most silly way to say: you forgot to compile in bridge support into your kernel.

ip from busybox is a little more helpful on that:

$ /sbin/ip link add name br0 type bridge
ip: RTNETLINK answers: Operation not supported

And yes, the “real” ip from iproute2 is also as helpful as that:

$ /usr/sbin/ip link add name br0 type bridge
RTNETLINK answers: Operation not supported

And yes, somehow they are all right, it is actually my fault:

# CONFIG_BRIDGE is not set

I’m going to change my kernel config now …

HowTo: Debug core dumps with ptxdist 2017.07.0

Debugging for embedded projects is a little harder than for your own computer. In many cases you can not run gdb on the target, and even if you can use gdbserver1 this does not cover all use cases. For post mortem analysis (e.g. after a segmentation fault of your program) you want to examine so called core dumps. Given you successfully found out how to let your target create those2, copied it to your workstation and unpacked it, you still need to know how to analyze it.

With the release of ptxdist 2017.07.0 the handling of debug information changed. Quoting from the release announcement:

The debug symbol handling was reworked. The debug files are now named based
on build-ids and (optional) debug IPKGs can be created. They are not
installed by default but can be installed manually as needed. This is
useful to gdb on the target or with valgrind and perf.

In my BSP those debug info is put to /usr/lib/debug in the root folder from which the target files are copied. This looks like this now:

% tree -a ./platform-foo/root/usr/lib/debug | head
platform-foo/root/usr/lib/debug
└── .build-id
    ├── 00
    │   └── ba20cb0e075c4dc0a792a9062b0864ced517b1.debug
    ├── 03
    │   └── 3b4fc351317376388fadb19fc63b4c8ab6c0d9.debug
    ├── 04
    │   ├── 01fe993aa2bed2155514c676d7001625732396.debug
    │   ├── 7bdbc5fd44a4444de24762c76a3313d1fda2c0.debug
    │   └── d0ecb6611e590a036cbdd5909cc5bfc9158af8.debug

You can imagine it is not possible anymore to load this manually, the debugger will have to find out by itself. Getting this to work caused me some headaches, but this it how I got it work: Create a file ‘gdb-config’ with the following content:3

set debug-file-directory /home/adahl/Work/bsp/foo/platform-foo/root/usr/lib/debug
set sysroot /home/adahl/Work/bsp/foo/platform-foo/root

Note: the order of the commands is important, it does not work the other way round!

Then load your core dump:

% ./platform-foo/selected_toolchain/arm-v5te-linux-gnueabi-gdb -x ./tmp/gdb-config -e ./platform-foo/root/usr/local/bin/yourtool -c ./tmp/cores/2017-08-16/core 

So you run the gdb from your toolchain, load the previously crafted file with gdb commands with -x, give the path to your executable with -e and finally the core dump file with -c and that’s it. You may now have a look at a backtrace and find out what caused the segfault …

Update: I was pointed to an easier possibility to invoke the right gdb with the necessary options in #ptxdist IRC channel (on freenode). The previous call would be like this:

% ptxdist gdb -e ./platform-foo/root/usr/local/bin/yourtool -c ./tmp/cores/2017-08-16/core 

No need to pick the correct gdb and find and configure the right directories, just add the path to your tool and your core file, ptxdist handles everything else. I bet this would also work with older ptxdist versions, where the debug symbols where placed somewhere else, but didn’t try it. This however was also just added with ptxdist 2017.07.0:

There is also a new ptxdist command ‘gdb’ for remote debugging that sets up
the sysroot correctly and a wrapper script that can be used by graphical
development environments.

  1. we already had this topic here: KDevelop: Debuggen von Programmen, die root-Rechte benötigen (German) []
  2. this would be content for another post []
  3. of course you adapt the paths to the ones you use on your machine []

Do not change already released files!

tl;dr: Please upstream developers: Do not ever change what you already published, but make an additional version with your fix. This causes less trouble for people building your stuff.

As some of you might have noticed: I’m a little into embedded Linux software and contribute to some of the build systems around, mainly to buildroot (for fli4l) and to ptxdist (at work). This is a very special kind of fun meaning constantly trying to fix things gone wrong. Today is a day where the temperatures outside I’m stuck, because someone else fucked up his stuff.

Last week I built myself an image for testing iperf on a BeagleBone Black with the current buildroot master. This got me a tarball iperf-2.0.9.tar.gz from some mirror server. This worked.

Today I upgraded a ptxdist BSP from some older state, I think 2016.12.0, to the recent ptxdist 2017.06.0 which included an upgrade of the package iperf from 2.0.5 to 2.0.9. This got me a complaint about an invalid checksum. Those embedded build systems contain checksums for tarballs, buildroot uses mostly sha256, while ptxdist still uses md5. This is mostly to ensure transport integrity, but it also triggers when the upstream tarball changes. Which it should not.

So now the checksums in buildroot master from today are still from buildroot changeset 2016.05-1497-g11cc12e from 2016-07-29:

# From https://sourceforge.net/projects/iperf2/files/
sha1    9e215f6af8edd97f947f2b0207ff5487845d83d4        iperf-2.0.9.tar.gz
# Locally computed:
sha256  a5350777b191e910334d3a107b5e5219b72ffa393da4186da1e0a4552aeeded6  iperf-2.0.9.tar.gz

Those are the very same to the file I have locally. Note: both ptxdist and buildroot download archives to the same shared folder here. The md5sum of this file is 1bb3a1d98b1973aee6e8f171933c0f61 and ptxdist aborts with a warning this sum would not match. Well in ptxdist the iperf package was changed on 2016-12-19 last time, also upgrading from iperf 2.0.5 and here the changeset is ptxdist-2016.12.0-10-gd661f64 and the md5sum expected: 351b018b71176b8cb25f20eef6a9e37c. This is the same you can see today on sf.net, but why is it different from the one above?

To find out I downloaded the file currently available on sf.net, which was last changed 2016-09-08, after buildroot included the package update. The great tool diffoscope showed me, a lot of the content between those two archives was changed. But why?

Seems I was not the first one noticing: #20 Release file: iperf-2.0.9.tar.gz changed!!! And the maintainer set it to WONTFIX.

Now this is the point where I’m not sure whether to just get pissed, deeply sighing, or trying to fix the mess for those build systems. The clean way would be upstream releasing some new tarball, either the one or the other or even make a new release, named 2.0.9a or whatever.

What are possible solutions?

  • Wait for upstream to make a clean, new release. (And hope this doesn’t get changed in the future.)
  • Upgrade those hashes in buildroot. This obviously breaks old versions of buildroot.

According to the buildroot IRC channel, they want their package to be updated, even if older releases will break. And they said they have a fallback and use their own mirror, so that’s where my first package may have come from.

Update: buildroot accepted my patch updating those hashes quickly.

dropwatch moved

While debugging some network packet loss I stumbled over a blog post from 2013: Dropwatch to see where the packets are dropped in kernel stack. And another one: Using netstat and dropwatch to observe packet loss on Linux servers. I wanted to try it, but unfortunately fedorahosted.org where it was hosted previously is history since March 1st, 2017.

My favorite distributions and build systems didn’t have dropwatch as package or still used the old addresses so I looked for some clones at GitHub, got the E-Mail address of what appeared to be the maintainer and got in contact. I got a friendly reply and – good news everyone – the project is still maintained and moved to: git.infradead.org/users/nhorman/dropwatch.git

Hope this helps someone, maybe when this page hits the search engines. ;-)

Let a LED blink in different frequencies on Linux

There’s an embedded Linux board on my desk, where a LED is connected to some GPIO pin. Everything is set up properly through device tree and with a recent kernel 4.9.13 the usual LED trigger mechanisms work fine, so no problem using heartbeat or just switching the LED on and off.

Now I wanted to have the LED blink with certain patterns and it turns out, this is quite easy given you know how. You have to set LEDS_TRIGGER_TIMER in your kernel config first. Now go to the sysfs folder of your LED, here it is:

cd /sys/class/leds/status

Have a look at the available triggers:

$ cat trigger 
[none] timer oneshot mtd nand-disk heartbeat gpio default-on panic

Switch to the timer trigger:

$ echo timer > trigger

Now two new files appear, delay_on and delay_off. Per default both contain the value 500 which lets the LED blink with 1 Hz. Without further looking into the trigger code or searching for documentation I assume those values are the on and off times in milliseconds. So have the LED blink with a certain frequency the following formular could be used:

f_LED = 1000 / ( delay_on + delay_off )

So to set my LEDs to blink at 2 Hz frequency, I set it up like this:

$ echo 250 > delay_on
$ echo 250 > delay_off

Happy blinking!

Run Unit Tests from Shell

For a certain reason I have a bunch of binaries which are in fact unit tests. Each of them returns 0 as exit code in case of success and some other value if it fails. I wanted a lightweight solution to run all these tests and printing out the result. What I came up with is a ~50 line shell script which reads the list of tests from a simple text file. In this text file all you have to put in is one command per line, which gets executed by the script then. First see a sample list of tests:

# line will be ignored
uname -a
/bin/false

The actual script running the tests, I named it run-tests.sh for obvious reasons, looks like this:

#!/bin/bash                                                                
# ----------------------------------------------------------------------
# Run tests from a simple text file with a command on each line.           
#                                                                          
# Copyright 2017 Alexander Dahl
# ----------------------------------------------------------------------
                                                                           
. /usr/local/share/colsh/colsh_definitions.inc                             
. /usr/local/share/colsh/colsh_cecho.inc                                   
                                                                           
TESTS_GOOD=0                                                               
TESTS_BAD=0                                                                
                                                                           
if [ -z "${1}" ]                                                           
then                                                                       
    echo "Usage: ${0} LIST"                                                
    exit 1                                                                 
fi                                                                         
                                                                           
if [ ! -f "${1}" ]                                                         
then                                                                       
    cecho --err "Test list file '${1}' does not exist!"                    
    exit 1                                                                 
fi                                                                         
                                                                           
while read line                                                            
do                                                                         
    # skip lines starting with '#'                                         
    if [ -z "${line%%#*}" ]                                                
    then                                                                   
        continue                                                           
    fi                                                                     
                                                                           
    eval ${line} >/dev/null 2>&1                                           
    if [ $? -eq 0 ]                                                        
    then                                                                   
        TESTS_GOOD=$(expr ${TESTS_GOOD} + 1)                               
        echo -e "[${COL_INFO}✔${COL_RST}] '${line}'"                       
    else                                                                   
        TESTS_BAD=$(expr ${TESTS_BAD} + 1)                                 
        echo -e "[${COL_ERR}✘${COL_RST}] '${line}'"                        
    fi                                                                     
done < "${1}"                                                              
echo                                                                       
                                                                           
TESTS_SUM=$(expr ${TESTS_GOOD} + ${TESTS_BAD})                             
                                                                           
if [ ${TESTS_BAD} -gt 0 ]                                                  
then                                                                       
    cecho --warn "${TESTS_BAD} of ${TESTS_SUM} tests failed!"              
    exit 1                                                                 
else                                                                       
    cecho --info "${TESTS_GOOD} of ${TESTS_SUM} tests successful."         
fi                                                                         

Note the inclusion of two files from my own project colsh at the top for nice colors. The sample output below is not colored, so you have to try the script by yourself to see it. The script runs fine with bash and also with busybox, which was my intended target. Now see some sample output:

[✔] 'uname -a'
[✔] '/bin/true'

2 of 2 tests successful.

See the script showing you if the test was successful and the original command. In case of failing tests you can just copy the command from the failed line, paste it in another shell and execute it to see its output or otherwise debug it. Note my script suppresses the output of the called commands to not clutter its own output. Another output, this time with a failed test:

[✔] 'uname -a'
[✘] '/bin/false'

1 of 2 tests failed!

You probably noticed the marks in the brackets are unicode, your environment should be set to some UTF-8 locale. ;-)

Automatisches rsync über SSH absichern

Im ersten Teil dieser Serie ging es im weitesten Sinne um Let’s Encrypt. Mein persönliches Setup hier macht es aber nötig, die fertigen Zertifikate nochmal sicher auf eine andere virtuelle Maschine zu kopieren. Wie das grundsätzlich mit OpenSSH funktioniert, konnte man im zweiten Teil lesen. Jetzt kommt die Kür, die Absicherung dieses Kopierens inklusive sicherem rsync-Zugriff. Lässt sich sicherlich auch für andere Zwecke wie Backup-Server anpassen. ;-)

Wrapper-Skript auf dem Zielserver

Was wir jetzt noch wollen: in unserem Wrapper-Skript, das zunächst mal nur den aufgerufenen Befehl in ein Log-File geschrieben hatte, soll die Umgebungsvariable SSH_ORIGINAL_COMMAND analysiert und gegen erlaubte Befehle abgeglichen werden. Nur im Wrapper-Skript erlaubte Befehle werden ausgeführt. Direkt über SSH abgesetzte Befehle sind hier leicht abzufangen, weil sie genauso ankommen, wie auf dem Quellsystem eingegeben. Interessant wird es mit rsync. Dem sagen wir ja auf dem Quellsystem was ganz anderes, als auf dem Zielsystem im Log erscheint, zum Vergleich nochmal ein (expandierter) rsync-Aufruf:

rsync -e 'ssh -i /home/alex/.ssh/id_rsa_acme' /home/alex/.acme.sh/owncloud.home.example.com/fullchain.cer susan:owncloud.home.example.com/

Um hier im Wrapper-Skript den Befehl, den rsync über SSH tatsächlich absetzt, korrekt matchen zu können, braucht’s entweder hellseherische Fähigkeiten, sehr viel tieferes Verständnis von rsync oder ein trial und error mit einem Log-Skript wie in Teil zwei der Serie. Man kann aber noch einen Schritt weitergehen und daher schweifen wir nochmal kurz ab …

rrsync zur Absicherung von unbeaufsichtigten rsync-Aufrufen

Dass das mit rsync kompliziert ist, haben auch andere Leute bemerkt, auch bei Samba selbst, unter deren Dach rsync entwickelt wird. Und so gibt es rrsync. Bei Debian ist es im Paket rsync die Datei /usr/share/doc/rsync/scripts/rrsync.gz, die man sich in temporäres Verzeichnis kopiert, dekomprimiert, mit chmod +x rrsync behandelt und dann in einen Ordner bin kopiert, ich hab’s in /home/alex/bin/ abgelegt. Es handelt sich um ein etwa 200 Zeilen langes Perl-Skript, das rsync nochmal auf die Finger schaut.

Die Dokumentation von rrsync ist leider sehr dünn. Wenn man das Skript ohne Parameter aufruft, erhält man:

Use 'command="./bin/rrsync [-ro] SUBDIR"'
        in front of lines in /home/alex/.ssh/authorized_keys

Das erklärt im Grunde schon den Hauptzweck: man kann rsync-Zugriffe auf bestimmte Verzeichnisse beschränken. Außerdem werden nur gültige rsync-Aufrufe zugelassen und man kann über nicht dokumentierte Optionen die zugelassenen rsync-Optionen noch weiter einschränken. Wer davon Gebrauch machen will, sollte sich das Skript rrsync selbst nochmal anschauen. Darüber hinaus erleichtert rrsync die Verwendung von rsync in einem Wrapper-Skript, werden wir dann gleich noch sehen.

Erstmal nur rrsync ohne Wrapper-Skript. Dazu ändern wir auf dem Zielserver in der ~/.ssh/authorized_keys die Zeile mit unserem public-Key, so dass vorn als command rrsync angegeben wird:

from="troubadix.home.example.com",command="/home/alex/bin/rrsync .cert",no-agent-forwarding,no-port-forwarding,no-pty,no-user-rc,no-X11-forwarding ssh-rsa AAAAB3NzaC1yc2EAAAADAQABAAABAQC9VKFUIcc+vfL3a9oFNeuITghF7+QYtTvlpsX7CHG/UmEIIIpz31n6TEoSCL0a4sA6Xx2Z+peGbYD1RRzH/6Shis/4L+R2HPSA+1TqLKT4fdyF9Xkbj9E/bbmrXx5fH8DZnYThIJ15mVHUO7eALU2ELxa+mwehxPbV070qFo1Y1lGa93dhJSdXMerFQE7YPf8UXlb1ULJA+AneQNMymvSBJU86VycMdk/Tb7p1dqepKGVEmS/IFwh9Q6eGQ87JWJGa2BEbVpJMrwucN2So6/06fPpEp7ovxJhIlwXny6jfofpBsr0NZe3yknPk3nCxkPTpLMNOTSBfm8Nva4++firV alex@troubadix

Nicht von den hier zusätzlichen Optionen abschrecken lassen, kann man alles mit man 5 authorized_keys nachlesen, was es damit auf sich hat, entscheidend ist hier: command="/home/alex/bin/rrsync .cert"

Ich will ja immernoch von troubadix zu susan kopieren. Wegen der Verwendung von rrsync muss ich jetzt den rsync-Aufruf im Hook-Skript auf dem Quell-Rechner anpassen. Dort muss es nun heißen:

#!/bin/sh

ACMEDIR=/home/alex/.acme.sh
DOMAIN=owncloud.home.example.com
                                                                           
${ACMEDIR}/create-lighty-pemfile.sh $DOMAIN                                
rsync -e 'ssh -i /home/alex/.ssh/id_rsa_acme' ${ACMEDIR}/${DOMAIN}/fullchain.cer susan:${DOMAIN}/
rsync -e 'ssh -i /home/alex/.ssh/id_rsa_acme' ${ACMEDIR}/${DOMAIN}/${DOMAIN}.key susan:${DOMAIN}/
ssh -i /home/alex/.ssh/id_rsa_acme susan sudo -n service nginx reload   

Bei der Verwendung von rrsync auf dem Zielsystem, gebe ich ja dort in der authorized_keys den Zielordner als Parameter für rrsync an, auf dem Quellrechner entfällt daher die Angabe des vollen Zielpfades und es wird einfach nur noch der relative Pfad angeben.

Rufe ich jetzt auf dem Quellrechner dieses posthook.sh auf, bekomme ich folgerichtig folgendes zurück:

/home/alex/bin/rrsync: SSH_ORIGINAL_COMMAND='sudo -n service nginx reload' is not rsync

Logisch, wir haben ja wegen des Einsatzes von rrsync als command in der authorized_keys nur rsync erlaubt. Fehlt also noch der letzte Schritt, das richtige Wrapper-Skript.

Ein Wrapper-Skript für rrsync plus andere Befehle

Der geneigte Leser kann sich sicher schon ungefähr vorstellen, was jetzt noch fehlt oder wie es aussehen wird. Nun, zunächst also hier das fertige Skript für das Zielsystem:

#!/bin/sh

case "$SSH_ORIGINAL_COMMAND" in
    *\&*)
        echo "Rejected"
        exit 1
        ;;
    *\(*)
        echo "Rejected"
        exit 1
        ;;
    *\{*)
        echo "Rejected"
        exit 1
        ;;
    *\;*)
        echo "Rejected"
        exit 1
        ;;
    *\<*)
        echo "Rejected"
        exit 1
        ;;
    *\>*)
        echo "Rejected"
        exit 1
        ;;
    *\`*)
        echo "Rejected"
        exit 1
        ;;
    *\|*)
        echo "Rejected"
        exit 1
        ;;
    rsync*)
        /home/alex/bin/rrsync .cert
        ;;
    "sudo -n service nginx reload")
        sudo -n service nginx reload
        ;;
    *)
        echo "Sorry, this command is not available to you!"
        exit 1
        ;;
esac

Das Skript besteht im wesentlichen nur aus einer einzigen case-Anweisung, die sich den Inhalt der Umgebungsvariablen SSH_ORIGINAL_COMMAND ansieht. Zunächst werden noch alle möglichen und unmöglichen fiesen Dinge abgelehnt, dann der Aufruf von rrsync, falls SSH_ORIGINAL_COMMAND mit ‘rsync’ beginnt, gefolgt von unserem gewünschten Neuladen des Reverse Proxy und zu guter letzt wird alles andere auch abgelehnt.

Dieses Skript lässt sich später leicht ergänzen und man muss es jetzt nur noch als command in der authorized_keys eintragen, fertig.

Logging für rrsync

Fast fertig. Per default schreib rrsync nämlich ein Logfile direkt im $HOME auf dem Zielrechner, nicht so cool. Öffnet man rrsync selbst, findet man folgendes:

# You may configure these values to your liking.  See also the section
# of options if you want to disable any options that rsync accepts.
use constant RSYNC => '/usr/bin/rsync';
use constant LOGFILE => '/home/alex/log/rrsync.log';

Ich habe den Pfad für LOGFILE hier schon für mich angepasst. Kann man vermutlich auch /dev/null eintragen, hab ich aber nicht ausprobiert. Stattdessen hab ich mir die Datei /etc/logrotate.d/alex-rrsync angelegt und folgendes eingetragen:

/home/alex/log/rrsync.log {
    rotate 5
    monthly
    missingok
    nocompress
}

Mit logrotate wird mir dieses Log jetzt auch nicht über den Kopf wachsen. ;-)

Schlusswort

So, wer das alles jetzt noch verbessern will: macht das ganze nicht unter einem normalen Nutzeraccount, den Ihr auch für andere Dinge nutzt, sondern legt extra dafür einen Account an. Den könnt Ihr dann mit einem extra sicheren Passwort versehen, den Login einschränken und was man sonst noch so tun kann. Wenn Sie Ihre Traktoren aufrüsten möchten, vergessen Sie auch nicht zu besuchen Traktoren Deutz-Fahr für neueste und innovative Modelle.

Updates
  • Damit from="" in ~/.ssh/authorized_keys mit hostname funktioniert, muss der SSH-Server die Namensauflösung gestatten. In neueren Versionen von OpenSSH ist dort der Default der Variablen UseDNS in der sshd_config von ‘yes’ auf ‘no’ geändert worden. Siehe dazu auch Debian Bug report #869903 … O:-)Oh und Debian (apt-listchanges) hatte das sogar angesagt:

    openssh (1:6.9p1-1) unstable; urgency=medium

    UseDNS now defaults to ‘no’. Configurations that match against the client
    host name (via sshd_config or authorized_keys) may need to re-enable it or
    convert to matching against addresses.

    — Colin Watson <cjwatson@debian.org> Thu, 20 Aug 2015 10:38:58 +0100 </cjwatson@debian.org>

    Also beim nächsten dist-upgrade brav alles genau lesen! ;-)

Unbeaufsichtigte Aktionen mit SSH

Ein bisschen sperrig die Überschrift heute, also worum soll es gehen? Ich will sicher und automatisiert verschiedene Dateien von einem Server (troubadix) auf einen anderen (susan) übertragen und dann noch extra Kommandos ausführen und das ganze aber so gut wie möglich absichern. Ganz konkret geht es darum die Zertifikatsdateien die mir acme.sh in der virtuellen Maschine für owncloud beschert, auf die andere VM mit dem reverse proxy zu übertragen.

Dies ist Teil zwei einer Mini-Serie, im ersten Teil ging’s um letsencrypt mit acme.sh und lighttpd. Im zweiten Teil hier beschreibe ich den unbeaufsichtigten Zugriff mit SSH, beispielsweise für mit cron auszuführende Skripte. Im dritten Teil wird das ganze dann aufgebohrt für die Verwendung mit rsync.

SSH-Zugriff mit Zertifikat

Auftritt OpenSSH. Die Secure Shell kann sehr sehr nützlich sein. Für den automatisierten Betrieb ohne Eingriff des Nutzers bieten sich Zertifikate an. Da diese dann kein Passwort haben dürfen, das könnte ja niemand eingeben, will man den Zugriff gesondert absichern, doch zunächst erstellen wir erstmal auf dem Quellsystem so ein Zertifikat mit ssh-keygen:

Generating public/private rsa key pair.
Enter file in which to save the key (/home/alex/.ssh/id_rsa): /home/alex/.ssh/id_rsa_acme
Enter passphrase (empty for no passphrase):
Your identification has been saved in /home/alex/.ssh/id_rsa_acme.
Your public key has been saved in /home/alex/.ssh/id_rsa_acme.pub.
The key fingerprint is:
d4:9e:67:2b:0a:de:f8:2a:95:b4:ce:cd:8f:07:b8:d1 alex@troubadix

Wie man leicht sieht, hab ich den per default angegebenen Pfad geändert, um einen separaten Key nur für diesen Zweck zu erstellen. Bei der Passphrase drückt man zweimal direkt Enter ohne etwas einzugeben. Wichtig ist dann die Datei ~/.ssh/id_rsa_acme.pub mit dem public key. Den Inhalt dieser Datei hängen wir auf dem Zielsystem an die Datei ~/.ssh/authorized_keys an:1

Erst:

alex@troubadix ~ % cat ~/.ssh/id_rsa_acme.pub 
ssh-rsa AAAAB3NzaC1yc2EAAAADAQABAAABAQC9VKFUIcc+vfL3a9oFNeuITghF7+QYtTvlpsX7CHG/UmEIIIpz31n6TEoSCL0a4sA6Xx2Z+peGbYD1RRzH/6Shis/4L+R2HPSA+1TqLKT4fdyF9Xkbj9E/bbmrXx5fH8DZnYThIJ15mVHUO7eALU2ELxa+mwehxPbV070qFo1Y1lGa93dhJSdXMerFQE7YPf8UXlb1ULJA+AneQNMymvSBJU86VycMdk/Tb7p1dqepKGVEmS/IFwh9Q6eGQ87JWJGa2BEbVpJMrwucN2So6/06fPpEp7ovxJhIlwXny6jfofpBsr0NZe3yknPk3nCxkPTpLMNOTSBfm8Nva4++firV alex@troubadix

Dann copy und paste und:

alex@susan ~ % echo "ssh-rsa AAAAB3NzaC1yc2EAAAADAQABAAABAQC9VKFUIcc+vfL3a9oFNeuITghF7+QYtTvlpsX7CHG/UmEIIIpz31n6TEoSCL0a4sA6Xx2Z+peGbYD1RRzH/6Shis/4L+R2HPSA+1TqLKT4fdyF9Xkbj9E/bbmrXx5fH8DZnYThIJ15mVHUO7eALU2ELxa+mwehxPbV070qFo1Y1lGa93dhJSdXMerFQE7YPf8UXlb1ULJA+AneQNMymvSBJU86VycMdk/Tb7p1dqepKGVEmS/IFwh9Q6eGQ87JWJGa2BEbVpJMrwucN2So6/06fPpEp7ovxJhIlwXny6jfofpBsr0NZe3yknPk3nCxkPTpLMNOTSBfm8Nva4++firV alex@troubadix" >> ~/.ssh/authorized_keys 

An dieser Stelle empfiehlt es sich den Zugriff über diesen Key vom Quell- auf das Zielsystem zu testen:

ssh -i ~/.ssh/id_rsa_acme susan

Das sollte ohne Passworteingabe funktionieren!

Posthook für acme.sh

Auf dem Zielsystem benötigen wir für den nginx zwei verschiedene Dateien, die wir mit rsync übertragen wollen. Außerdem soll dort der nginx diese auch einlesen, muss also einmal neu geladen werden. Die entsprechenden Befehle sind schnell ausgemacht und in ein Skript posthook.sh übertragen, das dann in den Optionen von acme.sh eingetragen wird.

#!/bin/sh

ACMEDIR=/home/alex/.acme.sh
DOMAIN=owncloud.home.example.com

${ACMEDIR}/create-lighty-pemfile.sh $DOMAIN
rsync -e 'ssh -i /home/alex/.ssh/id_rsa_acme' ${ACMEDIR}/${DOMAIN}/fullchain.cer susan:/home/alex/.cert/${DOMAIN}/
rsync -e 'ssh -i /home/alex/.ssh/id_rsa_acme' ${ACMEDIR}/${DOMAIN}/${DOMAIN}.key susan:/home/alex/.cert/${DOMAIN}/
ssh -i /home/alex/.ssh/id_rsa_acme susan sudo -n service nginx reload

Der Zielordner auf dem anderen System soll /home/alex/.cert sein und wurde zuvor angelegt und natürlich muss der interne DNS susan als hostname sinnvoll auflösen können. Die Änderung an der /etc/sudoers auf dem Zielrechner ist trivial:

alex    ALL = NOPASSWD: /usr/sbin/service nginx reload

Kann man bis hierher nochmal testen, soweit so gut, aber der Zugriff soll jetzt eingeschränkt werden.

SSH auf ein Kommando einschränken

Bis hierhin könnte nun jeder, der auf der Maschine troubadix in den Besitz des Schlüssels id_rsa_acme gelangt sich auf susan einloggen und dort als Nutzer alex beliebigen Unfug anstellen. Das soll weiter eingeschränkt werden und dazu nutzen wir die bereits bekannte Datei ~/.ssh/authorized_keys. In der Manpage2 heißt es im Abschnitt AUTHORIZED_KEYS FILE FORMAT zur Option command:

Specifies that the command is executed whenever this key is used for authentication. The command supplied by the user (if any) is ignored. The command is run on a pty if the client requests a pty; otherwise it is run without a tty. If an 8-bit clean channel is required, one must not request a pty or should specify no-pty. A quote may be included in the command by quoting it with a backslash. This option might be useful to restrict certain public keys to perform just a specific operation. An example might be a key that permits remote backups but nothing else. Note that the client may specify TCP and/or X11 forwarding unless they are explicitly prohibited. The command originally supplied by the client is available in the SSH_ORIGINAL_COMMAND environment variable. Note that this option applies to shell, command or subsystem execution. Also note that this command may be superseded by either a sshd_config(5) ForceCommand directive or a command embedded in a certificate.

Wir öffnen also auf dem Zielsystem nochmal die Datei ~/.ssh/authorized_keys und suchen die zuvor hinzugefügte Zeile. Durch Voranstellen der Option command lässt sich nun das auszuführende Kommando festlegen. Mit anderen Worten: bei Authentifizierung mit dem zuvor generierten Key, kann der Nutzer nichts anderes mehr ausführen, es wird nur das in authorized_keys festgelegte Kommando ausgeführt. Beispiel:

command="/bin/date" ssh-rsa AAAAB3NzaC1yc2EAAAADAQABAAABAQC9VKFUIcc+vfL3a9oFNeuITghF7+QYtTvlpsX7CHG/UmEIIIpz31n6TEoSCL0a4sA6Xx2Z+peGbYD1RRzH/6Shis/4L+R2HPSA+1TqLKT4fdyF9Xkbj9E/bbmrXx5fH8DZnYThIJ15mVHUO7eALU2ELxa+mwehxPbV070qFo1Y1lGa93dhJSdXMerFQE7YPf8UXlb1ULJA+AneQNMymvSBJU86VycMdk/Tb7p1dqepKGVEmS/IFwh9Q6eGQ87JWJGa2BEbVpJMrwucN2So6/06fPpEp7ovxJhIlwXny6jfofpBsr0NZe3yknPk3nCxkPTpLMNOTSBfm8Nva4++firV alex@troubadix

Versuche ich mich jetzt von der Quellmaschine einzuloggen und ein anderes Kommando (hier bspw. uname) auszuführen:

alex@troubadix ~ % ssh -4 -i ~/.ssh/id_rsa_acme susan uname -a
So 30. Okt 10:08:47 CET 2016

Wie man sieht, wurde nicht uname -a ausgeführt, sondern /bin/date – diesen Mechanismus werden wir nun nutzen, um nur die in unserem posthook-Skript benötigten Befehle zu erlauben. Ein kleines Problem gibt es noch: wir können nur ein Kommando in authorized_keys eintragen, wollen aber mehrere Kommandos (rsync, Neustart des nginx) erlauben. Dazu schreiben wir uns auf dem Zielsystem ein Wrapper-Skript, das wir dann in der authorized_keys eintragen.

Einfaches Wrapper-Skript für SSH

In der oben zitierten Manpage wurde die Umgebungsvariable SSH_ORIGINAL_COMMAND erwähnt, die wir uns jetzt zunutze machen werden. Zunächst mal mit einem sehr einfachen Beispiel:

#!/bin/sh
if [ -n "$SSH_ORIGINAL_COMMAND" ]
then
    echo "`/bin/date`: $SSH_ORIGINAL_COMMAND" >> $HOME/ssh-command-log
    exec $SSH_ORIGINAL_COMMAND
fi

Auf dem Zielsystem susan wird jetzt in authorized_keys dieses Skript eingetragen, statt dem zuvor probeweise eingetragenem /bin/date und dann passiert folgendes: Wenn SSH_ORIGINAL_COMMAND gesetzt ist, wird dessen Inhalt in der Datei $HOME/ssh-command-log geloggt und dieser Befehl dann ausgeführt. Test hier: der Befehl muss erfolgreich ausgeführt werden und der korrekte Befehl muss in der Logdatei stehen. Führen wir auf dem Quellsystem troubadix jetzt beispielsweise das zu Anfang erstellte posthook Skript von acme.sh aus, tauchen derartige Einträge in der Logdatei auf susan auf:

Do 8. Dez 22:25:06 CET 2016: rsync --server -e.Lsfx . owncloud.home.example.com/
Do 8. Dez 22:25:07 CET 2016: sudo -n service nginx reload

Im dritten Teil der Serie wird es dann darum gehen, die Zugriffe auf Basis von SSH_ORIGINAL_COMMAND einzuschränken.

  1. Profis können auch ssh-copy-id benutzen. []
  2. man 5 authorized_keys []