letsencrypt mit acme.sh und lighttpd

Vorgeschichte

Auf meinem Heimserver läuft owncloud, nein nicht nextcloud, sondern das Debian-Paket1. Konkret läuft das in einer virtuellen Maschine (troubadix) auf einem lighttpd. Ganz grob hatte ich das schonmal in owncloud mit lighttpd auf Debian Jessie beschrieben. An die VM komm ich aber nicht von außen ran, wenn ich das will, muss ich über den Reverse Proxy (nginx), der auf einer anderen VM (susan) läuft. Da mobile Geräte intern wie extern über die gleiche Adresse zugreifen sollen, gibt es dafür die Adresse owncloud.home.example.com2 und von extern landet man damit über die externe IPv4 und Port Forwarding im Router auf dem Reverse Proxy. Mein interner DNS3 löst die selbe Adresse als Alias bzw. cname direkt auf die VM mit der owncloud Instanz auf. Zugriffe sollen alle verschlüsselt ablaufen, zuvor sorgte ein von Hand installiertes Zertifikat von CAcert dafür. Der aufmerksame Leser wird sich denken können: dieses musste einmal im lighttpd (troubadix) und einmal im nginx (susan) installiert werden.

Das funktionierte alles soweit, bis das Zertifikat abgelaufen war. Aus diversen Gründen sollte das neue Zertifikat von letsencrypt kommen.

Zertifikate von letsencrypt

Was letsencrypt ist oder macht, die Erklärung spar ich mir an dieser Stelle. Fakt ist, dass es Alternativen zum offiziellen sogenannten certbot gibt und nicht zu knapp: ACME Client Implementations. Ich hatte mir kurz certbot und dehydrated angesehen, einige der gelisteten Implementierungen wird es ab Debian 9 (Stretch) auch direkt als Debian-Paket geben. Zum Einsatz kommt bei mir jetzt aber acme.sh, da ich es schnell verstanden habe und zügig einrichten konnte, naja fast. Ein bisschen tricky war es die webroot-Methode so einzurichten, dass auf der eigentlich voll verschlüsselten Domain das acme challenge Verfahren unverschlüsselt ablaufen kann.

acme.sh

Zur Installation von acme.sh hab ich als normaler User (alex) das GitHub-Repository geklont und etwas widerwillig mit ./acme.sh --install --accountemail post@lespocky.de installiert. Der Empfehlung das als root zu machen, würde ich nicht folgen. Eher legt man sich dafür noch einen extra User an, ich hab hier meinen normalen User benutzt, was aus security-Sicht auch nicht zu empfehlen ist. ;-) Letztlich braucht dieser Nutzer nur Schreibrechte in seinem eigenen $HOME und in einem Ordner, den der Webserver als webroot ausliefern kann.

Blöd: acme.sh hängt ungefragt folgende Zeile an meine ~/.zshrc an:

. "/home/alex/.acme.sh/acme.sh.env"

Der Inhalt dessen:

export LE_WORKING_DIR="/home/alex/.acme.sh"
alias acme.sh="/home/alex/.acme.sh/acme.sh"

Die beiden Zeilen hab ich aus der ~/.zshrc entfernt und stattdessen richtigerweise an ~/.zshenv angehängt. Ein entsprechendes Ticket upstream ist angelegt. Davon abgesehen, funktioniert das Skript aber sauber. Folgenden Aufruf hab ich benutzt:4

acme.sh --issue -d owncloud.home.example.com -w /var/www/html/le --reloadcmd 'sudo -n /usr/sbin/service lighttpd reload' --post-hook '/home/alex/.acme.sh/create-lighty-pemfile.sh owncloud.home.example.com'

Wie man schon sieht, werden die challenge sachen später in einem webroot in oder unterhalb von /var/www/html/le landen. Die Dateirechte und Gruppenzugehörigkeit dieses Ordners sind so gesetzt, dass der unpriviligierte Nutzer mit seinem cronjob drin schreiben und der webserver draus lesen kann.

Die nötige Zeile für /etc/sudoers, damit der cronjob auch den Webserver neu starten kann:

alex    ALL = NOPASSWD: /usr/sbin/service lighttpd reload

Daneben interessant ist sicherlich der post-hook, der nötig ist, weil lighttpd Zertifikat und private key zusammen in einer Datei erwartet, die Datei sieht so aus:

#!/bin/sh
ACMEDIR=/home/alex/.acme.sh
cat ${ACMEDIR}/${1}/${1}.cer ${ACMEDIR}/${1}/${1}.key > ${ACMEDIR}/${1}/${1}.lighty-pem

lighttpd

Der erste Teil der lighty-Konfiguration steht bei mir in /etc/lighttpd/lighttpd.conf und inkludiert meine ssl-Optionen:

$SERVER["socket"] == ":443" {
        include "ssl/lighty-ssl.conf"
}

Diese Datei hab ich mir vom Mozilla SSL Configuration Generator erstellen lassen und von Hand angepasst. Die für den Betrieb mit acme.sh angepassten Zeilen:

ssl.pemfile = "/home/alex/.acme.sh/owncloud.home.example.com/owncloud.home.example.com.lighty-pem"
ssl.ca-file = "/home/alex/.acme.sh/owncloud.home.example.com/ca.cer"

Wobei die erste Datei diejenige ist, die unser post-hook Skript generiert und die zweite das CA Zertifikat, das acme.sh runterlädt.

Fehlen noch zwei Puzzlestücke. Bei Debian schmeißt man die typischerweise nach /etc/lighttpd/conf-available und kann sie später mit lighty-enable-mod und lighty-disable-mod leicht aktivieren und deaktivieren. Teil eins ist etwas kürzer und steckt hier in der Datei 53-le.conf und sieht so aus:

alias.url += ( "/.well-known/acme-challenge" => "/var/www/html/le/.well-known/acme-challenge/" )

Gut zu sehen, das zuvor in der acme Konfiguration angegebene webroot. Knifflig und etwas umfangreicher jetzt die owncloud-Konfiguration, hier mal aus der Datei /etc/lighttpd/conf-available/59-owncloud.conf in voller Länge:

$HTTP["host"] == "owncloud.home.example.com" {
        # match all unencrypted traffic ...
        $HTTP["scheme"] == "http" {
                # but not the letsencrypt webroot ...
                $HTTP["url"] !~ "^/\.well-known/acme-challenge" {
                        # and redirect as described on https://redmine.lighttpd.net/projects/lighttpd/wiki/HowToRedirectHttpToHttps

                        # capture vhost name with regex conditiona -> %0 in redirect pattern
                        # must be the most inner block to the redirect rule
                        $HTTP["host"] =~ ".*" {
                                url.redirect = (
                                        ".*" => "https://%0$0"
                                )
                        }
                }
        }

        url.redirect = ( 
                "^/.well-known/caldav$" => "/remote.php/caldav/",
                "^/.well-known/carddav$" => "/remote.php/carddav/" 
        )

        alias.url += ( "" => "/usr/share/owncloud" )

        $HTTP["url"] =~ "^/data/" {
                url.access-deny = ("")
        }

        $HTTP["url"] =~ "^($|/)" {
                dir-listing.activate = "disable"
        }
} else $HTTP["host"] =~ "" {
        url.redirect = ( 
                "^/owncloud/.well-known/caldav$" => "/owncloud/remote.php/caldav/",
                "^/owncloud/.well-known/carddav$" => "/owncloud/remote.php/carddav/" 
        )

        # Make ownCloud reachable under /owncloud
        alias.url += ( "/owncloud" => "/usr/share/owncloud" )

        # Taken from http://owncloud.org/support/distro-notes, section "lighttpd":
        # As .htaccess files are ignored by lighttpd, you have to secure the /data
        # folder by yourself, otherwise your owncloud.db database and user data is
        # puplicly readable even if directory listing is off. 
        $HTTP["url"] =~ "^/owncloud/data/" {
                url.access-deny = ("")
        }

        $HTTP["url"] =~ "^/owncloud($|/)" {
                dir-listing.activate = "disable"
        }
}

Was hier realisiert wird, ist die Umleitung von allem unverschlüsselten Traffic auf https außer für den Teil, der für die acme challenge unverschlüsselt bleiben muss. Dazu weitere well-known URLs für einfacheren Kalenderzugriff aus bestimmten Anwendungen, das Verbot das Datenverzeichnis zu erreichen und die Deaktivierung von directory listing, alles für owncloud, hat nichts mehr mit acme zu tun, auch der unterste Abschnitt dient nur nochmal zum Zugriff auf owncloud über andere Adressen.

Erzwingt man hier keinen Zugriff über https, kann man sich einiges der Konfiguration sparen, aber der Sinn von letsencrypt ist ja grad, möglichst viel über https abzuwickeln.

Übertragen der Zertifikate auf Reverse Proxy

In der Praxis hab ich den lighttpd nicht direkt am Netz hängen, davor ist noch ein nginx als Reverse Proxy, der HTTPS mit dem gleichen Zertifikat sprechen soll. Weil das hier thematisch nicht mehr so gut dazu passt, hab ich eine kleine Serie von Beiträgen draus gemacht. Zu Teil 2 hier entlang: Unbeaufsichtigte Aktionen mit SSH.
  1. das wird noch ein Spaß mit dem Upgrade beim nächsten Release :-/ []
  2. Adresse von der Redaktion geändert []
  3. fli4l rockt! []
  4. streng genommen, war es ein Aufruf mit mehr Domains, alle mit eigenem -d davor, angepasst auf meine lokalen Bedürfnisse []

C/C++ developers please use -Wcast-align

Did you ever read the GCC documentation part Warning Options? If not, you may know the -Wall option. Yeah well, it enables a lot of options, but not literally all possible warnings. In my opinion setting -Wall should be the minimum you should set in every project, but there are more. You can also set -Wextra which enables even more warnings, but as you now might guess, still not all. Missing is especially one option, this post is about and the following describes why I consider it important to set: -Wcast-align

So what does the GCC doc say about it?

Warn whenever a pointer is cast such that the required alignment of the target is increased. For example, warn if a char * is cast to an int * on machines where integers can only be accessed at two- or four-byte boundaries.

In case you can not imagine what this means, let me explain. For example there are 32bit-CPUs out there which access memory correctly only at 32bit boundaries. This is to my knowledge by design. Let’s say you have some byte stream starting at an arbitrary aligned memory offset and it contains bytes starting from 0, followed by 1, then 2 and so on like this:

00 01 02 03 04 05 06 07

Now you set an uint32_t pointer to a non aligned address and dereference it. What would you expect? To help you a little, I have a tiny code snippet for demonstration:

uint8_t     buf[8];
uint32_t    *p32;
int         i;

/*  fill the buffer as described above  */
for ( i = 0; i < sizeof(buf); i++ ) {
    buf[i] = i;
}

for ( i = 0; i < sizeof(buf); i++ ) {
    p32 = (uint32_t *) &buf[i];
    printf( "0x%08X ", *p32 );
}
printf( "\n" );

The naïve assumption would be the following output:

0x03020100 0x04030201 0x05040302 0x06050403 0x07060504 0x15070605 0x02160706 0xC3021707

Note the last three containing some random bytes from memory behind our buffer! This is the output you get on a amd64 standard PC with little endian format (compiled on Debian GNU/Linux with some GCC 4.9.x).

Now look at this output:

0x03020100 0x00030201 0x01000302 0x02010003 0x07060504 0x04070605 0x05040706 0x06050407

This comes from an embedded Linux target with an AT91SAM9G20 Arm CPU, which is ARM9E family and ARMv5TEJ architecture or lets just say armv5 or older Arm CPU. Here It runs as little endian and was compiled with a GCC 4.7.x cross compiler.

Well those 32bit integers look somehow reordered, as if the CPU would shuffle the bytes of the word we point into? If you’re not aware of this this means silent data corruption on older Arm platforms! You can set the -Wcast-align option to let the compiler warn you, you may try this by yourself with the above snippet and your favorite cross compiler. Note: the warning does not solve the corruption issue, it just warns you to fix your code.

When reading the FAQ by Arm itself on this topic it’s not quite clear what the supposed behavior is, but what is clear is the following: unaligned access is not supported on older Arm CPUs up to ARM9 family or ARMv5 architecture.

Another point is interesting: even if the CPU supports unaligned access, whether it’s hard coded or an optional thing you must switch on first, it will give you a performance penalty. And coming back to my PC: this is also true for other processor families like Intel or AMD, although on recent processors it might not be that bad.

So what could or should we do as software developers? Assuming there are still a lot of old processors out there and architectures you might not know, and you never know where your code will end up: design your data structures and network protocols with word alignment in mind! If you have to deal with legacy stuff or bad protocols you can not change, you still have some other possibilities, have a look at The ARM Structured Alignment FAQ or search the net on how to let your kernel handle this.

If you want to handle it in code, memcpy() is one possibility. Assume we want to access a 32bit integer at offset 2, we could do it like this:

uint8_t *buf;
uint32_t myint;

memcpy( &myint, buf + 2, sizeof(uint32_t) );

And as said in the topic and above: turn on the -Wcast-align option!

(If you don’t want to be too scared about silent data corruption on your new IoT devices with those cheap old processors and your freshly compiled board support package, you might not want to turn it on on all those existing software out there. You might get a little depressed … )

Update: There’s a chapter on the Linux kernel documentation on this: Unaligned Memory Accesses.

Update: Also see EXP36-C. Do not cast pointers into more strictly aligned pointer types of the SEI CERT C Coding Standard.

KDevelop: Debuggen von Programmen, die root-Rechte benötigen

Häufig arbeite ich mit KDevelop und dort auch gern mit dem integrierten Debugger bzw. dem entsprechenden Frontend für gdb. Heute hatte ich ein Programm am Wickel, was einen lauschenden Socket auf einem privilegierten Port aufmachen will. Mit KDevelop konnte ich dies nicht direkt mit den nötigen Root-Rechten starten. Um es trotzdem debuggen zu können, kann man stattdessen mit gdbserver und remote debugging arbeiten. Das geht so:

In der bereits angelegten Launch Configuration geht man auf die Einstellungen für Debug und dort kann man unter »Remote Debugging« drei Dateien angeben. Man muss hier tatsächlich zwei bis drei Dateien anlegen und diese mit dem passenden Inhalt füllen. Die erste ist das gdb config script, wo man nochmal den Pfad zum ausgeführten Binary einträgt. Das sollte genau das sein, was auch über das Projekt kompiliert wird (mit Debug-Symbolen drin natürlich):

file /home/adahl/Work/build/tlue-gcc/src/tlue

Das dritte ist das run gdb script, hier sagt man dem gdb wohin er sich verbinden soll, in diesem Fall wird das ein gdbserver sein, der auf der selben Maschine auf Port 12345 lauschen wird:

target remote localhost:12345

Jetzt ist noch die Frage, was kommt bei run shell script rein? Wenn man es leer lässt, muss man den gdbserver von Hand starten, bevor man in KDevelop auf »Debug« klickt, das könnte auf einer entsprechenden Konsole in dem Build-Ordner des Programms so aussehen:

sudo gdbserver localhost:12345 ./src/tlue

Oder man baut sich noch eine dritte Datei, diesmal ein Shell-Skript, wo man den zuletzt genannten Befehl ausführt. Dieses gibt man dann an zweiter Stelle an. Klappte hier bei mir spontan nicht, weil sudo da noch nach einem Passwort fragt, was ich in KDevelop nicht eingeben kann.

Java Enterprise Loop

Following a discussion in the Netz39 IRC channel I created a short Java Enterprise Loop for those in need.

package com.penguineering.seriousnonsense;

/*
 * Short usage instructions:
 *
 * 		final Runnable loopee = ... // Acquire some runnable instance
 * 		EnterpriseLoop.forRunnable(loopee).run();
 *
 * or put it in a thread:
 * 
 * 		new Thread(EnterpriseLoop.forRunnable(loopee)).start();
 *
 *
 * Whatever kills your design best.
 */

public class EnterpriseLoop implements Runnable {
	public static EnterpriseLoop forRunnable(final Runnable _loopee) throws NullPointerException {
		return new EnterpriseLoop(_loopee);
	}
	
	private final Runnable loopee;
	
	private EnterpriseLoop(final Runnable _loopee) throws NullPointerException {
		if (_loopee == null)
			throw new NullPointerException("Runnable _loopee must not be null!");
		
		this.loopee = _loopee;
	}
	
	public Runnable getLoopee() {
		return loopee;
	}
	
	@Override
	public void run() {
		while (true)
			try {
				loopee.run();
			} catch {Throwable t) {
				// ignore
			}
	}
}

To adhere to development standards usually found in situations leading to the need of an enterprise loop, I neither documented the code (except for a short usage instruction to save you from thinking about those lines you are going to copy) nor tested it.

I leave this to the public domain to successfully serve as a bad example.

Sometimes I’m in the mood to destruct my devices. Luckily some drivers may have an ioctl for that:

Most devices can perform operations beyond simple data transfers; user space must often be able to request, for example, that the device lock its door, eject its media, report error information, change a baud rate, or self desctruct.

(Linux Device Drivers, Third Edition, by Jonathan Corbet, Alessandro Rubini, and Greg Kroah-Hartman, published 2005 by O’Reilly®)

HowTo: fli4l, openvpn und NetworkManager in KDE4

Ich beschäftige mich gerade mit VPN. Das Fernziel ist fli4l und Freifunk etwas näher zusammenzubringen. Um ein bisschen die Füße nass zu kriegen mit tun und tap und die ganzen Kenntnisse von Routing, Paketfiltern usw. etwas aufzufrischen, hab ich mir was angeschaut, was ich schon ewig vor hatte: eine simple Roadwarrior-Config für den OpenVPN auf dem fli4l. Wie man in der Newsgroup spline.fli4l.dev nachlesen kann, verwende ich hier folgende Config (noch ohne Zugriff auf das hinter dem OpenVPN liegende Netz):

OPT_OPENVPN='yes'
OPENVPN_EXPERT='no'
OPENVPN_WEBGUI='yes'
OPENVPN_DEFAULT_CIPHER='AES-128-CBC' # alix 2d3
OPENVPN_DEFAULT_DIGEST='SHA256'
OPENVPN_N='1'
OPENVPN_1_NAME='tiffy'
OPENVPN_1_ACTIV='yes'
OPENVPN_1_LOCAL_PORT='14187'
OPENVPN_1_LOCAL_VPN_IP='10.131.205.1'
OPENVPN_1_REMOTE_VPN_IP='10.131.205.2'
OPENVPN_1_SECRET='tiffy.secret'
OPENVPN_1_TYPE='tunnel'

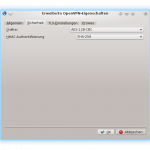
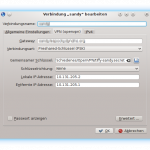
Der Teufel liegt natürlich im Detail. Bei fli4l werden für die OpenVPN-Verbindung sogenannte secrets, also pre shared keys in Form von Dateien verwendet.1 Das knifflige ist die ganzen Optionen, die bei fli4l explizit und implizit gesetzt werden, auf dem Roadwarrior korrekt einzustellen. Ich verwende hier Debian Jessie mit KDE4 und dem NetworkManager. Entscheidend waren neben den korrekten IP-Adressen die richtigen Einstellungen für Cipher und Auth und die richtigen Haken an den richtigen Stellen. Erschwert wird sowas immer dadurch, dass es subtil andere Bezeichnungen gibt, vor allem, wenn auch noch übersetze GUIs im Spiel sind.

Die Zuordnung ist im vorliegenden Fall wie folgt (auch auf »Erweitert« klicken ;-) ):

fli4l KDE Plasma NetworkManager
OPENVPN_x_LOCAL_HOST (leer) Gateway
OPENVPN_x_REMOTE_VPN_IP Lokale IP-Adresse
OPENVPN_x_LOCAL_VPN_IP Entfernte IP-Adresse
OPENVPN_x_LOCAL_PORT Gateway-Port
OPENVPN_DEFAULT_FRAGMENT UDP-Fragmentgröße
OPENVPN_DEFAULT_COMPRESS LZO-Komprimierung verwenden
OPENVPN_DEFAULT_CIPHER Chiffre
OPENVPN_DEFAULT_DIGEST HMAC-Authentifizierung

Und weil’s vielleicht besser ersichtlich ist, auch nochmal als Screenshots.

Die Pings gehen jetzt durch und zwar sowohl gegen fli4l 3.10 als auch gegen fli4l 4.0 und der nächste Schritt ist die Anpassung der Paketfilter. Dann kommt vielleicht noch die dauerhafte Verbindung dieser beiden Netze und vielleicht teste ich auch nochmal was mit tap devices. Da fällt mir schon noch was ein. Aber hier ging’s ja erstmal nur um Roadwarrior und für heute soll’s das hier erstmal gewesen sein.

  1. OpenVPN bietet auch noch public/private Key und Passwörter, das wird bei fli4l aber nicht benutzt. []

Styling a select box with CSS and jQuery

As mentioned on Twitter last week, HTML form elements and style are a pain in the ass. Some things a customer wants are not possible with HTML and CSS only, some can be improved with JavaScript. Last problem on a customer project I had were select elements with size="1" or a dropdown menu as a UI designer would probably call it. Note right here: yes it has to be <select> because it’s inside a form which should work without JavaScript as well.

I personally liked the approach of formalize.me very much, not designing all by myself but just tweak it to reasonable consistent looking. This was not an option in this case. I reviewed some solutions with CSS only but they all had drawbacks or visible flaws. Already using jQuery in this project jQuery UI came to my mind, but making a complete new style to match the requirements or extracting just the needed parts from selectmenu seemed to complicated.

A solution I liked was the one by Ryan Fait on Checkboxes, Radio Buttons, Drop Down Menu Select Lists, Custom Form Elements, CSS Form Styling. On the first look it seems to be fully integrated in your style, only after clicking on the select menu you get the browser/operation system UI elements, which is a good compromise with less complexity. Because I already had CSS only solutions for check boxes an radio buttons I only needed the select list part.

Ryan uses plain JavaScript and I thought I could simplify the code, because I use jQuery in this project anyway, so this is my solution.

HTML with some options left out for brevity:

<div id='timezone'>
  <label for='select_tz' class='before like_dl_dt'>Time Zone</label>
  <select size='1' name='lst_zone' id='select_tz' class='select_like_dl_dd'>
    <optgroup label='America'>
      <option value='America/Sao_Paulo'>Sao_Paulo</option>
      <option value='America/Puerto_Rico'>Puerto_Rico</option>
      <option value='America/Caracas'>Caracas</option>
    </optgroup>
    <optgroup label='Europe'>
      <option value='Europe/Berlin'>Berlin</option>
      <option value='Europe/Oslo'>Oslo</option>
      <option value='Europe/Copenhagen' selected='selected'>Copenhagen</option>
    </optgroup>
  </select>
</div>

CSS:

.like_dl_dt {
	width:		150px;
	margin:		4px 0 0 16px;
	display:	block;
	float:		left;
}

.select_like_dl_dd {
	width:		170px;
	height:		20px;
	margin:		0 0 6px 166px;
	z-index:	5;
	display:	block;
}

.select_face {
	position:	absolute;
	overflow:	hidden;
	line-height:	20px;
	background:	rgb(237,239,242) url("select_bg.png") no-repeat;
	border:		1px solid rgb(208,212,215);
	border-radius:	3px;
	height:		20px;
	padding:	0 4px;
	width:		160px;
}

The select_bg.png file for this case is 168×20px. JavaScript with jQuery already loaded:

$(document).ready(function(){
	var span = $("<span></span>")
			.attr("class", "select_face")
			.attr("id", "select_tz_face")
			.text($("#select_tz").val().split('/').pop() );
	$("#select_tz")
			.css("opacity", "0")
			.before( span );
	$("#select_tz").change(function(){
		$("#select_tz_face").text( this.value.split('/').pop() );
	});
});

Note: the value/split stuff is because the value of the <option> elements is different from the content, but on select box change I do not want to display the actual content. I’m not sure if one can access the text between the option tags, if yes, sent me a hint! ;-)

You see I left out a lot here and there’s no easy to inspect example for download, but I’m sure you can puzzle it together by yourself. :-)

Update: after a hint in the comments I came up with a better solution for the Update of the face span, see:

	var span = $("<span></span>")
			.attr("class", "select_face")
			.attr("id", "select_tz_face")
			.text( $(":selected").text() );
	$("#select_tz")
			.css("opacity", "0")
			.before( span );
	$("#select_tz").change(function(){
		$("#select_tz_face").text( $(":selected").text() );
	});

:-)

A Talk About Nothing

(via Twitter)

Raspberry Pi automatisch mit dem Freifunk-WLAN verbinden

Ich setze gerade diverse Mini-Knoten auf Raspberry-Pi-Basis auf, die sich für den Internet-Zugang automatisch mit dem Magdeburger Freifunk verbinden sollen.

Anleitungen zur Verbindung mit einem WPA-verschlüsselten WLAN gibt es genug. Nur leider schweigen die zur Frage, was man denn mit einem unverschlüsselten WLAN1 macht.

Schließlich bin ich doch auf Stack Exchange und auf der man page des wpa_supplicant fündig geworden. An dieser Stelle sei die notwendige Konfiguration noch einmal zusammengefasst.

Ich nutze einen USB-WLAN-Adapter von CLS mit externer Antenne; intern ist das ein RTL8191SU 802.11n WLAN Adapter,der direkt unterstützt wird.

In /etc/network/interfaces wird für das WLAN-Device (wlan0) folgendes angefügt:

allow-hotplug wlan0
iface wlan0 inet dhcp
wpa-conf /etc/wpa_supplicant/wpa_supplicant.conf

iface default inet dhcp

Der Eintrag in /etc/wpa_supplicant/wpa_supplicant.conf sieht dann so aus:

network={
    ssid="md.freifunk.net"
    key_mgmt=NONE
    id_str="default"
}

Durch den Eintrag key_mgmt=NONE , der  meist verschwiegen wird, stellt der wpa_supplicant keine verschlüsselte Verbindung her, sondern nutzt das WLAN unverschlüsselt, wie es für Freifunk notwendig ist. In einem anderen Freifunk-Netzwerk muss natürlich die ESSID angepasst werden.

Nach einem Neustart verbindet der Raspberry Pi sich nun automatisch mit dem Freifunk-Netzwerk, sofern es erreichbar ist.

  1. zum Beispiel einem Freifunk-WLAN []

HowTo: ownCloud mit lighttpd auf Debian Jessie

Der Fortschritt macht nicht halt und dass jemand™ sich jetzt ein Fairphone mit Android drauf gekauft hat, war eine willkommene Gelegenheit sich mal eine eigene ownCloud-Instanz aufzusetzen. Debian Jessie ist zwar derzeit noch »testing« aber schon ganz gut nutzbar und da es dort fertige Pakete für ownCloud 7 gibt und eine passende VM auf dem Server zu Haus bereits lief, fiel die Wahl darauf. Ein lighttpd mit PHP lief auch schon und der Rest war auch so schwer nicht.

Im derzeitigen Stand des Paktes muss man die Datenbank für ownCloud noch selbst anlegen. Ich hab das mit phpmyadmin gemacht, wo das Debian-Paket sich selbst schon einfach in lighttpd integriert. Die Zugangsdaten gibt man später beim Einrichtungswizard vom ownCloud an.

Im ownCloud Paket ist eine Möglichkeit dokumentiert, das Paket mit lighttdp zu nutzen, die automatische Integration wie bspw. bei phpmyadmin gibt es so nicht. Der falsch vorgeschlagene Pfad in der Doku, wurde von mir gemeldet und ich hab noch ein paar Dinge ergänzt:

$HTTP["host"] == "owncloud.example.com" {
        url.redirect = (
                "^/.well-known/caldav$" => "/remote.php/caldav/",
                "^/.well-known/carddav$" => "/remote.php/carddav/"
        )

        alias.url += ( "" => "/usr/share/owncloud" )

        $HTTP["url"] =~ "^/data/" {
                url.access-deny = ("")
        }

        $HTTP["url"] =~ "^($|/)" {
                dir-listing.activate = "disable"
        }
} else $HTTP["host"] =~ "" {
        url.redirect = ( 
                "^/owncloud/.well-known/caldav$" => "/owncloud/remote.php/caldav/",
                "^/owncloud/.well-known/carddav$" => "/owncloud/remote.php/carddav/"
        )
        
        # Make ownCloud reachable under /owncloud
        alias.url += ( "/owncloud" => "/usr/share/owncloud" )
          
        # Taken from http://owncloud.org/support/distro-notes, section "lighttpd":
        # As .htaccess files are ignored by lighttpd, you have to secure the /data
        # folder by yourself, otherwise your owncloud.db database and user data is
        # puplicly readable even if directory listing is off.
        $HTTP["url"] =~ "^/owncloud/data/" {
                url.access-deny = ("")
        }
        
        $HTTP["url"] =~ "^/owncloud($|/)" {
                dir-listing.activate = "disable"
        }
}

Der untere Teil ist aus dem Vorschlag vom Paket übernommen, nur der alias-Pfad korrigiert. Der obere Teil ist für den direkten Zugriff über eine andere Subdomain statt über den hostname des Servers und einen Unterordner. An sich steht da aber das gleiche drin. Besonderes Augenmerk sei noch auf die redirects für die sogenannten well-known URLs nach RFC 5785 gelegt, die den Zugriff mit bestimmten Kalenderprogrammen deutlich vereinfachen.

Nachtrag: Dieses Mini-HowTo unterschlägt die Einrichtung von verschlüsseltem Zugriff über HTTPS. Ich habe das weggelassen, weil es a) an anderer Stelle gut beschrieben ist und b) ich hier noch einen nginx als Reverse Proxy vor dem lighty habe, der mit diesem HowTo rein gar nichts zu tun hat. ;-)